Contrast of Small Threads of Titanium Alloy Parts Processed by Tapping with Different Taps
Titanium tapping is the most difficult process in titanium alloy machining, especially for small threads. This difficulty is mainly manifested in the large total torque of tapping, which is about twice that of 45 steel; The tap teeth are worn out, chipped, and even "bitten" in the threaded holes and broken. This is because the elastic modulus of titanium alloy is too small, the surface of the thread produces a great rebound, which increases the contact area between the tap and the workpiece, resulting in a great friction torque and worn worse. In addition, the chip is small and not easy to bend, there is sticky knife phenomenon, resulting in chip removal difficulties. Therefore, the key to solving the problem of tapping of titanium alloy is to reduce the contact area between the tap and the workpiece during tapping.
(1) Ordinary tap:
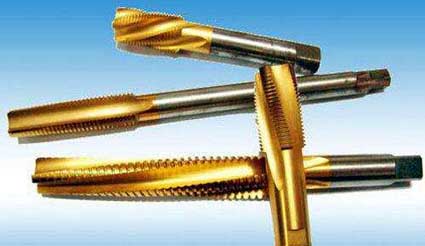
Must after technical treatment before being tapping titanium alloy screw. The measures for treating common taps are as follows:
Increase the chip space and reduce the number of teeth; after leaving 0.2 to 0.3 mm of the knife belt on the calibration tooth, increase the back angle to 20° to 30°, and grind the middle section of the tooth along the full length of the tap; After retaining 2 to 3 buckles, increase the back taper from 0.05 to 0.2 mm/100 mm to 0.16 to 0.32 mm/100 mm. When the other conditions are exactly the same, if the back width is reduced (grinded) by 1/2 to 2/3, the tapping torque is reduced by 1/4 to 1/3.
(2) Modified Tooth Taper:
The correction tooth tap is to change the forming thread of the standard tap into a progressive method. The working principle is shown in Figure 7-6.
As can be seen from the figure, the tooth profile angle α0 of the correction tooth tap is smaller than the thread tooth angle α1. Make the tap side of the tap and the side surface of the thread to be cut to form a side gap angle φ=(α1-α0)/2, and make the tap thread a larger inverted cone. A side clearance angle of=(alpha 1-alpha 0)/2 is formed between the tooth side of the tap and the side surface of the cut thread, and a larger inverted cone is made from the tap thread. The friction torque is greatly reduced, and the cooling and lubrication of the cutting fluid is also facilitated.
The inverted taper of the standard tap starts from the calibrated tooth, and the amount of the inverted taper is (0.05 to 0.2) mm/100 mm; The inverted cone of the modified tap is started from the first cutting tooth, and the inverted cone value is much larger than the standard tap. Correction taps such as κr = 7°30' can reach 1.437 mm/100 mm. Due to the increased amount of inverted taper, the calibration part of the modified tooth tap can not play a guiding role, and the cylindrical guide must be made when cutting the front end of the cone. As the amount of inverted taper increases, the calibration part of the modified tooth tap can not play a guiding role, so the cylindrical guide part must be made when cutting the front end of the taper. Figure 7-7 is an example of the structure and geometric parameters of the modified tooth tap. The surface roughness of threads tapped with modified taps is not as good as that of formed taps.
(3) Interrupted thread tap:
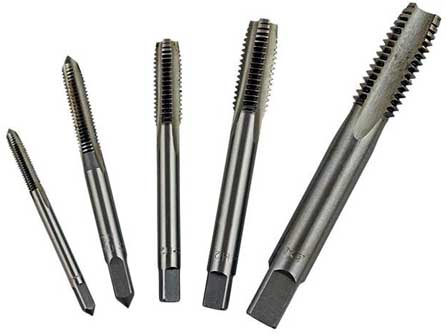
Interrupted thread tap is to remove the screw between the cutting teeth and the calibration teeth. Its greatest feature is that it effectively reduces the contact area between tap and workpiece, and makes the tapping torque decrease significantly. Due to the inter-tooth tapping, there is a relatively wide space between the adjacent side edges of the screw, which improves the condition of the chip and cutting fluid entering the cutting zone and improves the durability of the tap; At the same time, when manufacturing the tap, the top of the outer edge of the grinding wheel does not need to be too sharp, which improves the grinding conditions. The schematic diagram of the Interrupted thread tap is shown in Figure 7-8.
Under the same cutting conditions, the tapping torque of the Interrupted thread tap is about 30% to 50% of the standard tap, 35% to 60% of the modified tap, and the durability is 1 to 3 times higher than the modified tap. Titanium alloy tapping is best with Interrupted thread tap.
(4) Threaded bottom hole:
For the titanium alloy tapping, the diameter of the bottom hole is generally selected based on the height ratio of the dental ridge (the ratio of the actual tooth height of the screw hole to the theoretical height) of not more than 70%. That is, the diameter of the bottom hole of the thread is d1=d0-0.757 8p (d0 is the nominal size of the thread, and p is the pitch moment). Small diameter or coarse thread, the tooth height can be larger. When the strength of the processed material is low or the thread depth is less than the basic diameter of the thread, the tooth height rate can be increased appropriately, but too much will increase tapping torque or even break the tap. To ensure tapping accuracy and surface quality, the threaded bottom hole should be the hinged hole.
The tapping speed of titanium alloy is determined by the type and hardness of the material.The tapping speed of α-titanium alloy generally takes Vc=7.5~12 m/min, α+β titanium alloy takes Vc=4.5~6 m/min, and β titanium alloy takes Vc=2~3.5 m/min;
When the hardness of titanium alloy is ≤HB350, a higher cutting speed is used, and vice versa. For the tapping of titanium alloy, the extreme pressure cutting fluid containing Cl and P is generally better, but the extreme pressure cutting fluid containing Cl must be cleaned after tapping to prevent intergranular corrosion of the parts; A mixed oil of 60% castor oil and 40% kerosene can also be used as the cutting fluid.
The drilling hole is semi-closed cutting, and the cutting temperature is very high in the process of drilling titanium alloy. After drilling, the rebound is large, the drilling cuttings are long and thin, easy to bond and not easy to discharge, often resulting in bits being bitten, twisting and other malignant accidents. Therefore, the drill bit is required to have high strength and good rigidity, and the chemical affinity of the drill bit to the titanium alloy is small, and it is preferable to use a cemented carbide drill bit. However, the most commonly used one is still twist drill, and after some measures are taken to improve it, it can also achieve better results.
(1) Improve the drill bit:
In order to meet the needs of drilling titanium alloys, the following improvements should be taken for twist drills: Increase the top angle of the drill bit, 2Ф=135°~140°; increase the back angle at the outer edge of the drill bit, take 12°~15°; Increase the helix angle, p = 35 ° ~ 40 °; increase the thickness of the core, take (0.22 ~ 0.4) do (do is the drill diameter).
Use the "S" shape or "X" shape to grind the chisel chisel edge, the length of the chisel edge b = (0.08 ~ 0.1) do, while ensuring the symmetry of the chisel edge ≤ 0.06 mm. Both forms of the chisel edge form a second cutting edge that acts as a chip and reduces axial forces during drilling.
The most common is to grind a cutting edge shape suitable for drilling a titanium alloy on a twist drill, that is, a titanium alloy group drill having a shape of a cutting portion as shown in Fig. 7-1. In the figure, the outer inner edge apex angles 2φ and 2φ' are 130° to 140° when the drill diameter is 3 to 10 mm, and 125° to 140° when do > 10 to 30 mm; The outer blade back angle α is 12° to 18° when do>3~10 mm, and 10°~15° when do>10~30 mm;
Horizontal blade bevel angle ψ = 45 °;
Inner blade rake angle γτ=-10°~-15°;
Inner blade angle τ = 10 ° ~ 15 °;
Arc back angle aR=18°~20°.
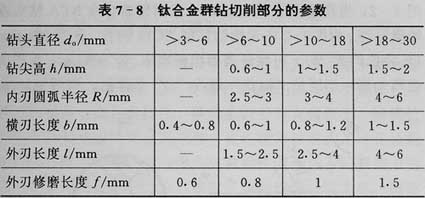
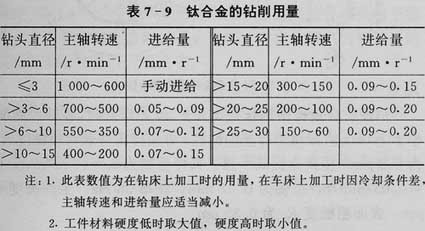
See Table 7-8 and Table 7-9 for the relevant parameters and drilling dosage of titanium alloy group drill.


(1) Ordinary tap:
Must after technical treatment before being tapping titanium alloy screw. The measures for treating common taps are as follows:
Increase the chip space and reduce the number of teeth; after leaving 0.2 to 0.3 mm of the knife belt on the calibration tooth, increase the back angle to 20° to 30°, and grind the middle section of the tooth along the full length of the tap; After retaining 2 to 3 buckles, increase the back taper from 0.05 to 0.2 mm/100 mm to 0.16 to 0.32 mm/100 mm. When the other conditions are exactly the same, if the back width is reduced (grinded) by 1/2 to 2/3, the tapping torque is reduced by 1/4 to 1/3.

(2) Modified Tooth Taper:
The correction tooth tap is to change the forming thread of the standard tap into a progressive method. The working principle is shown in Figure 7-6.

As can be seen from the figure, the tooth profile angle α0 of the correction tooth tap is smaller than the thread tooth angle α1. Make the tap side of the tap and the side surface of the thread to be cut to form a side gap angle φ=(α1-α0)/2, and make the tap thread a larger inverted cone. A side clearance angle of=(alpha 1-alpha 0)/2 is formed between the tooth side of the tap and the side surface of the cut thread, and a larger inverted cone is made from the tap thread. The friction torque is greatly reduced, and the cooling and lubrication of the cutting fluid is also facilitated.
The inverted taper of the standard tap starts from the calibrated tooth, and the amount of the inverted taper is (0.05 to 0.2) mm/100 mm; The inverted cone of the modified tap is started from the first cutting tooth, and the inverted cone value is much larger than the standard tap. Correction taps such as κr = 7°30' can reach 1.437 mm/100 mm. Due to the increased amount of inverted taper, the calibration part of the modified tooth tap can not play a guiding role, and the cylindrical guide must be made when cutting the front end of the cone. As the amount of inverted taper increases, the calibration part of the modified tooth tap can not play a guiding role, so the cylindrical guide part must be made when cutting the front end of the taper. Figure 7-7 is an example of the structure and geometric parameters of the modified tooth tap. The surface roughness of threads tapped with modified taps is not as good as that of formed taps.
(3) Interrupted thread tap:

Interrupted thread tap is to remove the screw between the cutting teeth and the calibration teeth. Its greatest feature is that it effectively reduces the contact area between tap and workpiece, and makes the tapping torque decrease significantly. Due to the inter-tooth tapping, there is a relatively wide space between the adjacent side edges of the screw, which improves the condition of the chip and cutting fluid entering the cutting zone and improves the durability of the tap; At the same time, when manufacturing the tap, the top of the outer edge of the grinding wheel does not need to be too sharp, which improves the grinding conditions. The schematic diagram of the Interrupted thread tap is shown in Figure 7-8.
Under the same cutting conditions, the tapping torque of the Interrupted thread tap is about 30% to 50% of the standard tap, 35% to 60% of the modified tap, and the durability is 1 to 3 times higher than the modified tap. Titanium alloy tapping is best with Interrupted thread tap.
(4) Threaded bottom hole:
For the titanium alloy tapping, the diameter of the bottom hole is generally selected based on the height ratio of the dental ridge (the ratio of the actual tooth height of the screw hole to the theoretical height) of not more than 70%. That is, the diameter of the bottom hole of the thread is d1=d0-0.757 8p (d0 is the nominal size of the thread, and p is the pitch moment). Small diameter or coarse thread, the tooth height can be larger. When the strength of the processed material is low or the thread depth is less than the basic diameter of the thread, the tooth height rate can be increased appropriately, but too much will increase tapping torque or even break the tap. To ensure tapping accuracy and surface quality, the threaded bottom hole should be the hinged hole.
The tapping speed of titanium alloy is determined by the type and hardness of the material.The tapping speed of α-titanium alloy generally takes Vc=7.5~12 m/min, α+β titanium alloy takes Vc=4.5~6 m/min, and β titanium alloy takes Vc=2~3.5 m/min;
When the hardness of titanium alloy is ≤HB350, a higher cutting speed is used, and vice versa. For the tapping of titanium alloy, the extreme pressure cutting fluid containing Cl and P is generally better, but the extreme pressure cutting fluid containing Cl must be cleaned after tapping to prevent intergranular corrosion of the parts; A mixed oil of 60% castor oil and 40% kerosene can also be used as the cutting fluid.
The drilling hole is semi-closed cutting, and the cutting temperature is very high in the process of drilling titanium alloy. After drilling, the rebound is large, the drilling cuttings are long and thin, easy to bond and not easy to discharge, often resulting in bits being bitten, twisting and other malignant accidents. Therefore, the drill bit is required to have high strength and good rigidity, and the chemical affinity of the drill bit to the titanium alloy is small, and it is preferable to use a cemented carbide drill bit. However, the most commonly used one is still twist drill, and after some measures are taken to improve it, it can also achieve better results.

(1) Improve the drill bit:
In order to meet the needs of drilling titanium alloys, the following improvements should be taken for twist drills: Increase the top angle of the drill bit, 2Ф=135°~140°; increase the back angle at the outer edge of the drill bit, take 12°~15°; Increase the helix angle, p = 35 ° ~ 40 °; increase the thickness of the core, take (0.22 ~ 0.4) do (do is the drill diameter).
Use the "S" shape or "X" shape to grind the chisel chisel edge, the length of the chisel edge b = (0.08 ~ 0.1) do, while ensuring the symmetry of the chisel edge ≤ 0.06 mm. Both forms of the chisel edge form a second cutting edge that acts as a chip and reduces axial forces during drilling.
The most common is to grind a cutting edge shape suitable for drilling a titanium alloy on a twist drill, that is, a titanium alloy group drill having a shape of a cutting portion as shown in Fig. 7-1. In the figure, the outer inner edge apex angles 2φ and 2φ' are 130° to 140° when the drill diameter is 3 to 10 mm, and 125° to 140° when do > 10 to 30 mm; The outer blade back angle α is 12° to 18° when do>3~10 mm, and 10°~15° when do>10~30 mm;
Horizontal blade bevel angle ψ = 45 °;
Inner blade rake angle γτ=-10°~-15°;
Inner blade angle τ = 10 ° ~ 15 °;
Arc back angle aR=18°~20°.
See Table 7-8 and Table 7-9 for the relevant parameters and drilling dosage of titanium alloy group drill.
