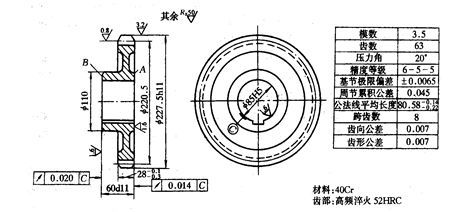
CNC Lathe Processing High Precision Spur Gear Process
Spur gear machining process

High precision gear
1. Blank forging
2. Normalizing heat treatment
3. Rough shape, leaving a machining allowance of 2mm
Positioning reference: outer circle and end face
4. finishing the entire inner bore to Φ84.8H7, the total length of stay grinding allowance 0.2mm, to the remaining dimensions
Positioning reference: outer circle and end face
5. Inspection
6. Rolling the tooth surface, leaving the grinding tooth 0.25~0.3mm
Positioning reference: inner hole and end face A
7. Chamfering
Positioning reference: inner hole and end face A
8. Fitter deburring
9. Tooth surface induction hardening HRC52
10. Key slot
Positioning reference: inner hole and end face A
11. Grinding the large end face A
Positioning reference: inner hole
12. Grinding B face to total length
Positioning reference: end face A
13. Grinding the inner hole to φ85H5
Positioning reference: inner hole and end face A
14. Tooth surface grinding
Positioning reference: inner hole and end face A
15. Inspection
Gear processing process analysis
1. Selection of positioning criteria
The choice of the gear positioning reference is often different due to the structural shape of the gear. The shaft gear is mainly used for top positioning, and the cone is blocked when the aperture is large. The accuracy of the top positioning is high and the benchmark can be unified. The perforated gears often use the following two positioning and clamping methods when machining the tooth surface.
(1) Positioning with inner hole and end face
That is, the inner hole and the end surface of the workpiece are jointly positioned to determine the center and axial position of the gear, and the clamping method facing the positioning end surface is adopted. This method makes the positioning reference, design basis, assembly reference and measurement reference coincide, and the positioning accuracy is high, which is suitable for mass production. But high requirements for manufacturing precision jig.
(2) Outside circle and end face positioning
The matching clearance between the workpiece and the clamp mandrel is large, and the outer circle is corrected by a dial gauge to determine the position of the center, and the end face is positioned; Apply clamping from the other end face. This method is calibrated for each workpiece, so the production efficiency is low; It requires high coaxiality of the inner and outer circles of the billet, but does not require high accuracy of the fixture, so it is suitable for single piece and small batch production.
2. Processing of gear blanks
Gear tooth surface rough machining before processing, plays an important role in the whole gear machining process. Because the benchmark used for tooth surface machining and inspection must be machined at this stage; Regardless of the increase in productivity or the quality of the gears, the processing of the gear blanks must be emphasized.
In the technical requirements of the gear, it will be noted that dimensional accuracy of the addendum circle. Because the tooth thickness is measured based on the top circle of the tooth, the accuracy of the tooth tip circle is too low, which inevitably makes the measured tooth thickness value not correct.
Therefore, the following three issues should be noted in this process:
(1) When the diameter of the tip circle is used as the measurement reference, the dimensional accuracy of the tip circle should be strictly controlled.
(2) Ensure the perpendicularity of the positioning end face and the positioning hole or the outer circle
(3) Improve the manufacturing precision of the gear inner hole and reduce the matching clearance with the clamp mandrel


