Understanding the Structural Design of Metal Bending Parts
Guide: The bending process requires that the designed structure adhere to the bending deformation law: Minimum radius of curvature, springback, minimum side length of bending, bending process hole or process groove, hole margin, bending process, bending dimension labeling and bending accuracy, etc. Sometimes it is necessary to calculate the billet estimating equipment and so on.
Bending process:
The pressing process of bending a member such as a sheet, a profile, a tube, or the like into a part having a constant curvature and a certain shape is called bending.
It is usually bent on a press, bent on a folding machine, rolled on a coiling machine, and bent, manually bent, and the like. The use of hemming, bending to increase the moment of inertia, and the modulus of the section to increase the rigidity is a good way to lighten the design.
When bending the configuration of a part, you must pay attention to how the part is placed in the mold.
It is very difficult to deform 180 degrees on the full length of bending, especially for hard materials. Therefore, when bending, a small opening should be left at the corner beforehand.
When bending a U-shaped piece. The long side cannot be chosen too small.
The bending radius should be selected according to the material grade and the thickness of the hardness tester. For thin materials, bending is easier, bending radius can be fixed smaller, because of the smaller resilience, can get a greater degree of firmness.
When bent, the matte side of the workpiece should be oriented as far as possible in the direction of bending, so as not to tear the burr by tension.
On symmetrical parts, a symmetrical positioning hole can be preset to prevent the error-proofing station when bending.
On a U-shaped workpiece, the two curved sides must be as long as possible to avoid shifting to one side when bending. If not allowed, a process hole can be provided for positioning.
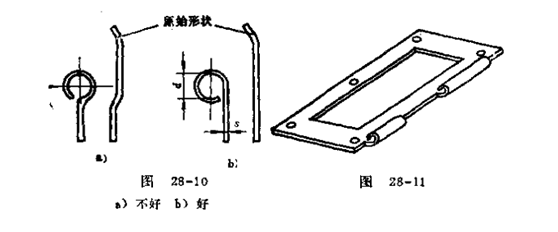
Edge rolling is a special kind of bending. The inner diameter of the coiled hole is determined by the thickness of the material of the crimped workpiece, The inner diameter of the winding hole should be capitalized. Generally, the inner diameter D (> 1.5t) is enough. It is unnecessary to set the center line of the crimping edge at the center of the metal sheet. If the plane of the metal sheet is placed at the tangent position of its cylinder, it is economical to manufacture, as shown in the following figure b.
Characteristics of bending deformation:
The sheet is bent, and the bending deformation zone is usually thinned.
When the bar is bent, when r≥1.5d, the curved cross section is substantially unchanged; When r<1.5d, the bending deformation zone is distorted, and the neutral layer coefficient x changes. (Specific parameters check related manual)
Tubes are bent, usually with thinner outer walls and thicker inner walls, and change from circular to elliptical.
The fillet radius of the bent piece should be greater than the minimum bend radius of the material.
In order to obtain a smaller bending radius, a bending method or a multiple bending method after bending the inner side groove may be employed.
Bending process holes or slots:
When the bending line of the bending piece overlaps with the outer edge, in order to avoid corner distortion or cracking, the process hole or groove should be punched first. Process hole d ≥ t (d is the process hole diameter, t is the plate thickness); The groove depth is A>R (bending radius) and B>t (plate thickness).
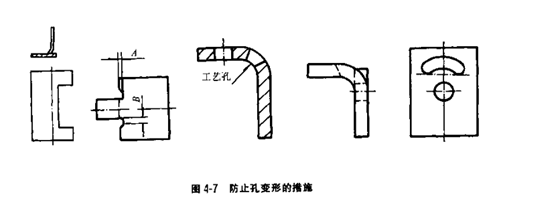 Hole margin: The hole in the curved part should avoid the bending deformation zone. If it must be close, the process hole should be added and then bent.
The holes on the bending parts are punched before bending and bended before punching. The hole on the curved piece is divided into a first punch and then a bend and a first bend and then a punch. Some bends are not good after the bend.
The holes on the bending parts are punched before bending and bended before punching. Some bends do not stamp well. The hole punched first and then bent should not be too close to the edge to avoid deformation of the hole. If possible, the hole or groove of the process can be added, or the edge of the hole is away from the center of the bend, s ≥ t, t is large, and s is correspondingly larger.
Shape design of bending parts:
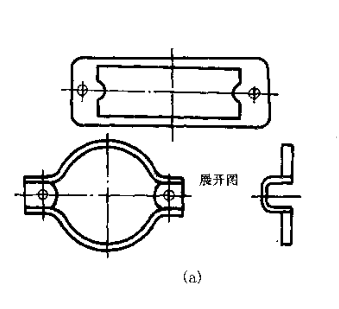
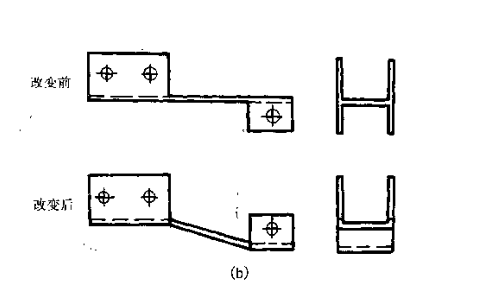
The shape is suitable for the bending process is easy to understand. Good process but not necessarily low cost. As shown in Figure a below, three molds are required for blanking, bending, and re-cutting. If cut into strips, it will be more economical. As shown in Figure b, the bending direction is changed to be uniform, and the mold structure is simple and easier to manufacture. Certification analysis, unchanged save material, blanking die, bending die are small, only more turning bending, but need to operate twice.
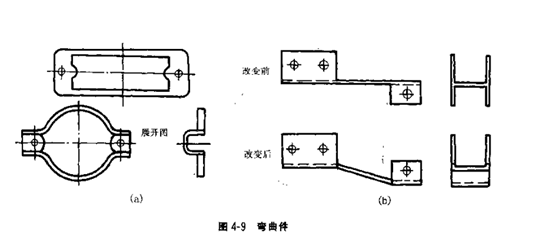
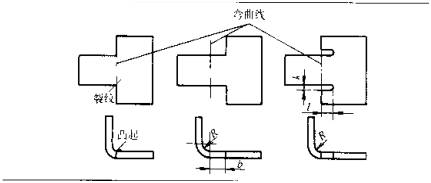
When bending parts with different width and narrowness, attention should be paid to the position of bending line. Otherwise, protrusions or cracks will occur on the wide edges. The bend line can be moved out of a distance or punched into the process gap.
The straight edge height of the curved piece should be greater than twice the material thickness. If the straight edge of the curved part is required to be straight, the straight side height H (excluding the bending radius) should be greater than twice the material thickness, preferably H>3t. If < 2T, the groove must be pre-pressed.
Dimensions:
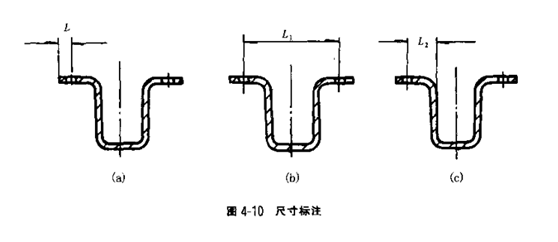
The position and size of the hole, as shown in Figure a, is processed by blanking and punching, so that the processing is simple, but the hole position accuracy is low. As shown in the figures b and c, the process is blanking, bending, or punching at the same time. The mold is complicated, but the precision is high. Therefore, dimensioning is related to process, precision, and cost, and it is worth thinking by designers.
Bending accuracy:
The accuracy of the bending parts is not high, and the dimensional accuracy is IT12~IT16 because of various influences such as plate thickness deviation and rebound.
Bending process:
The pressing process of bending a member such as a sheet, a profile, a tube, or the like into a part having a constant curvature and a certain shape is called bending.
It is usually bent on a press, bent on a folding machine, rolled on a coiling machine, and bent, manually bent, and the like. The use of hemming, bending to increase the moment of inertia, and the modulus of the section to increase the rigidity is a good way to lighten the design.
When bending the configuration of a part, you must pay attention to how the part is placed in the mold.
It is very difficult to deform 180 degrees on the full length of bending, especially for hard materials. Therefore, when bending, a small opening should be left at the corner beforehand.
When bending a U-shaped piece. The long side cannot be chosen too small.
The bending radius should be selected according to the material grade and the thickness of the hardness tester. For thin materials, bending is easier, bending radius can be fixed smaller, because of the smaller resilience, can get a greater degree of firmness.
When bent, the matte side of the workpiece should be oriented as far as possible in the direction of bending, so as not to tear the burr by tension.
On symmetrical parts, a symmetrical positioning hole can be preset to prevent the error-proofing station when bending.
On a U-shaped workpiece, the two curved sides must be as long as possible to avoid shifting to one side when bending. If not allowed, a process hole can be provided for positioning.
Edge rolling is a special kind of bending. The inner diameter of the coiled hole is determined by the thickness of the material of the crimped workpiece, The inner diameter of the winding hole should be capitalized. Generally, the inner diameter D (> 1.5t) is enough. It is unnecessary to set the center line of the crimping edge at the center of the metal sheet. If the plane of the metal sheet is placed at the tangent position of its cylinder, it is economical to manufacture, as shown in the following figure b.

Characteristics of bending deformation:
The sheet is bent, and the bending deformation zone is usually thinned.
When the bar is bent, when r≥1.5d, the curved cross section is substantially unchanged; When r<1.5d, the bending deformation zone is distorted, and the neutral layer coefficient x changes. (Specific parameters check related manual)
Tubes are bent, usually with thinner outer walls and thicker inner walls, and change from circular to elliptical.
The fillet radius of the bent piece should be greater than the minimum bend radius of the material.
In order to obtain a smaller bending radius, a bending method or a multiple bending method after bending the inner side groove may be employed.
Bending process holes or slots:
When the bending line of the bending piece overlaps with the outer edge, in order to avoid corner distortion or cracking, the process hole or groove should be punched first. Process hole d ≥ t (d is the process hole diameter, t is the plate thickness); The groove depth is A>R (bending radius) and B>t (plate thickness).

The holes on the bending parts are punched before bending and bended before punching. The hole on the curved piece is divided into a first punch and then a bend and a first bend and then a punch. Some bends are not good after the bend.
The holes on the bending parts are punched before bending and bended before punching. Some bends do not stamp well. The hole punched first and then bent should not be too close to the edge to avoid deformation of the hole. If possible, the hole or groove of the process can be added, or the edge of the hole is away from the center of the bend, s ≥ t, t is large, and s is correspondingly larger.

Shape design of bending parts:
The shape is suitable for the bending process is easy to understand. Good process but not necessarily low cost. As shown in Figure a below, three molds are required for blanking, bending, and re-cutting. If cut into strips, it will be more economical. As shown in Figure b, the bending direction is changed to be uniform, and the mold structure is simple and easier to manufacture. Certification analysis, unchanged save material, blanking die, bending die are small, only more turning bending, but need to operate twice.


The straight edge height of the curved piece should be greater than twice the material thickness. If the straight edge of the curved part is required to be straight, the straight side height H (excluding the bending radius) should be greater than twice the material thickness, preferably H>3t. If < 2T, the groove must be pre-pressed.
Dimensions:
The position and size of the hole, as shown in Figure a, is processed by blanking and punching, so that the processing is simple, but the hole position accuracy is low. As shown in the figures b and c, the process is blanking, bending, or punching at the same time. The mold is complicated, but the precision is high. Therefore, dimensioning is related to process, precision, and cost, and it is worth thinking by designers.

Bending accuracy:
The accuracy of the bending parts is not high, and the dimensional accuracy is IT12~IT16 because of various influences such as plate thickness deviation and rebound.


