Research on Deep Hole Drilling Technology of TA10 Titanium Alloy Precision Parts in China
Summary: In this paper, the difficulties and solutions for deep hole machining of TA10 titanium alloy parts are analyzed. The machining test was carried out, the tool angle was optimized, and the wear mechanism of the machining tool was analyzed. It has achieved good processing results and has certain reference significance for deep hole drilling of α-type titanium alloy.
Key words: TA10 titanium alloy; deep hole drilling; tool design; wear mechanism
TA10(Ti - 0. 3Mo - 0. 8Ni) Titanium alloy is a kind of near α titanium alloy. In general, the shape of titanium alloy round bar and rectangular bar is forged, extruded, rolled and drawn. It is a Ti- 12 alloy developed by the United States in the mid-1970s and has a strong resistance to crevice corrosion.
At 300 ° C, the tensile strength is nearly twice that of industrial pure titanium, and the corrosion resistance of the reducing medium is strong, and corrosion can be prevented in the chloride of 150 - 200 ° C. And TA10 material does not contain rare metals, and the processing performance is relatively good. It is widely used in some environments where pure titanium may have crevice corrosion. TA10 titanium alloy has excellent process properties and can be forged in the range of 850 - 950 °C for hot working at the lowest possible temperature. Surface contamination can be minimized. In order to prevent hydrogen embrittlement caused by hydrogen absorption of materials, it is necessary to heat in an oxidizing environment. It has excellent plasticity and bending properties. Forming in a 250 ° C environment can reduce springback. Argon shielded tungsten arc welding is usually used. In order to avoid the pollution of C, N, H and O, special protection is needed when the welding temperature reaches 430 C.
The TA10 material has the following characteristics:
(1) has a high design stress;
(2) having corrosion resistance equal to or exceeding that of pure titanium in an oxidizing medium;
(3) Corrosion resistance is superior to pure titanium in reducing media;
(4) It has good resistance to crevice corrosion in high temperature oxides;
(5) The cost is lower.
So TA10 material as heat exchanger, tubular reactor, serpentine tube, crystallizer has developed rapidly in chemical industry, light industry, nuclear industry, environmental protection and other fields. Its mechanical properties are more obvious than those of other materials.

Table 1. Mechanical properties comparison between TA10 and TA2 pure titanium and 45# steel
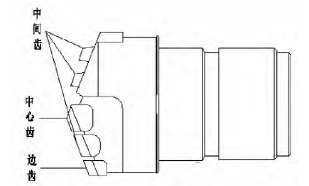
Fig.1 Schematic diagram of TA10 titanium alloy deep hole drilling bit
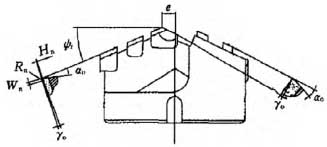
Fig.2 Angle diagram of TA10 titanium alloy deep hole drilling bit
Scanning Electron Microscope JSM - 6390A: A scanning electron microscope is an electron microscope that uses an electron beam to scan a sample surface to obtain sample information.
It can produce high-resolution images of the sample surface, and the images are three-dimensional. Scanning electron microscopy can be used to identify the surface structure of the sample.
It consists of three major parts:
Vacuum systems, electron beam systems, and imaging systems. This article mainly uses it to conduct two experiments. The first is to observe the surface morphology of the blade. Secondly, the wear mechanism of the tool is analyzed by the energy spectrum analysis of the tool surface and the residual components.
Handheld roughness meter:
It is used to measure the surface roughness of a variety of machined parts, calculate the corresponding parameters according to the selected measurement conditions, and clearly display all measurement results and graphics on the LCD. The test piece is a near-α-type titanium alloy TA10, which is a titanium rod of Φ290 mm × 2700 mm.
2, Test scheme
In this experiment, the TA10 bar was drilled and drilled with a 54 mm diameter deep hole drilled through hole. In this experiment, TA10 rod is drilled by using a 54 mm diameter deep hole drill to drill through the hole. Drilling by changing the front and rear corners of the drill. Data were collected by single factor variable method to observe the vibration during processing. The roughness of the inner hole wall of the workpiece is measured by a roughness meter. And the wear condition of the tool is observed by electron microscope to get the best process parameters. The wear mechanism of TA10 material for deep hole drilling was obtained by studying the wear and residual components of the drill bit to analyze the cause of tool wear.
Specific processing parameters:
(1) Processing system: BTA deep hole machining system based on CW6163D deep hole machining machine;
(2) Processing tools: Φ54 five-tooth type wrong tooth deep hole drill bit, blade material YG8 cemented carbide;
(3) Tool angle: The rake angle is 3°, 7°, the back angle is 8°, 12°, the residual angle is 18°, and the eccentricity of the drill tip is 4 mm.
(4) Workpiece materials: TA10 titanium rod of Φ290 mm × 2700 mm;
(5) Cutting fluid: Emulsion
(6) Movement mode: Tool feed, workpiece rotation;
(7) Cutting parameters: The drilling depth is 2700 mm, the hole diameter is φ55 mm, the tool speed is 145 r/min, and the feed rate is 0.12 mm/r.
3, the experimental results
The experimental data obtained from the experiment are shown in Table 3.
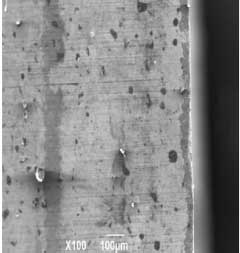
Fig. 3 Wear phenomenon of rake face
Considering the relevant processing conditions, it can be known that the plastic deformation ability of the material is poor. When the tool front angle is taken as a small value of 3°, the contact length of the 7° chip and the rake face is increased compared with the front angle, the wear of the rake face is relatively increased, and the tool durability is decreased; However, since the stress concentration of the rake face is slowed down, the cutting temperature and the strength of the tool are reduced. At the same time, it is found that the titanium alloy material has a small modulus of deformation and a small modulus of elasticity during deep hole drilling. In the process of machining, material rebound is serious, which results in friction between tool flank and workpiece at a small angle, resulting in sharp increase of cutting heat and abnormal vibration of the system. The wear phenomenon of the tool is serious, and even the phenomenon of cutting and chipping occurs, so the back angle of the tool needs to be increased, and 12° is preferred. In addition, it is found through comparison that the effect of the tool back angle is more significant than the front angle when cutting the titanium alloy. Therefore, increasing the back angle can improve the tool durability more effectively under the premise of ensuring the tool strength. Therefore, the front angle is 3° and the back angle is 12°. The microscopic results of the wear and tear of the props are shown in Fig. 3 - Fig. 4. It can be seen that in the deep hole drilling of TA10 material, the flank wear of the tool is far more serious than the rake face due to the rebound phenomenon of the material. The dark and light color partitions of the flank face were analyzed by a scanning electron microscope.
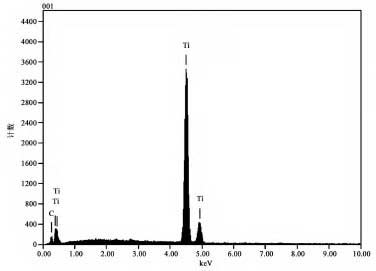
Fig. 5 Drilling titanium alloy tool dark zone energy spectrum
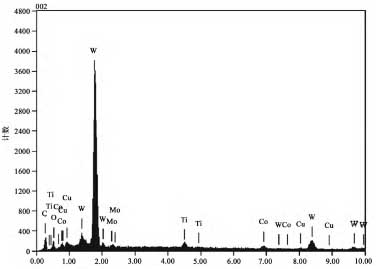
Fig. 6 Energy Spectrum of Light Color Zone of Titanium Alloy Drilling Tools
It can be found that a large amount of Ti elements are enriched in the dark areas close to the blade. In the light-colored area far from the edge of the tool, W, Co and other cutting tool materials are dominant. There is only a very small amount of Ti element, which indicates that the workpiece material has obvious adhesion phenomenon under high temperature and high pressure during processing. Comprehensive research found that in the deep hole machining of TA10, due to the high cutting force and cutting temperature, the hardness of the workpiece material is not large, and the affinity is strong. Therefore, the wear of cemented carbide tools is mainly based on bond wear.
In this test, the roughness of the machined hole was measured and analyzed by the TR200 hand-held roughness meter, because the hole depth was large. Therefore, the roughness sampling of the drill hole at the end of the workpiece is used for comparative analysis.
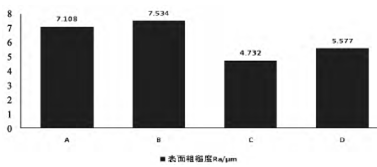
Fig. 7 Surface roughness of the inner hole at different tool angles
Key words: TA10 titanium alloy; deep hole drilling; tool design; wear mechanism
TA10(Ti - 0. 3Mo - 0. 8Ni) Titanium alloy is a kind of near α titanium alloy. In general, the shape of titanium alloy round bar and rectangular bar is forged, extruded, rolled and drawn. It is a Ti- 12 alloy developed by the United States in the mid-1970s and has a strong resistance to crevice corrosion.
At 300 ° C, the tensile strength is nearly twice that of industrial pure titanium, and the corrosion resistance of the reducing medium is strong, and corrosion can be prevented in the chloride of 150 - 200 ° C. And TA10 material does not contain rare metals, and the processing performance is relatively good. It is widely used in some environments where pure titanium may have crevice corrosion. TA10 titanium alloy has excellent process properties and can be forged in the range of 850 - 950 °C for hot working at the lowest possible temperature. Surface contamination can be minimized. In order to prevent hydrogen embrittlement caused by hydrogen absorption of materials, it is necessary to heat in an oxidizing environment. It has excellent plasticity and bending properties. Forming in a 250 ° C environment can reduce springback. Argon shielded tungsten arc welding is usually used. In order to avoid the pollution of C, N, H and O, special protection is needed when the welding temperature reaches 430 C.
The TA10 material has the following characteristics:
(1) has a high design stress;
(2) having corrosion resistance equal to or exceeding that of pure titanium in an oxidizing medium;
(3) Corrosion resistance is superior to pure titanium in reducing media;
(4) It has good resistance to crevice corrosion in high temperature oxides;
(5) The cost is lower.
So TA10 material as heat exchanger, tubular reactor, serpentine tube, crystallizer has developed rapidly in chemical industry, light industry, nuclear industry, environmental protection and other fields. Its mechanical properties are more obvious than those of other materials.

Table 1. Mechanical properties comparison between TA10 and TA2 pure titanium and 45# steel
1. Test equipment and workpiece
Machine tool processing system: The deep hole drilling test of TA10 is carried out by using BTA deep hole drilling system. The system machine tool is CW6163D deep hole machining machine; The drill bit uses a φ54 mm five-tooth deep hole drill bit, as shown in Figure 1; The blade material is YG8 and the tool angle is shown in Figure 2. The deep hole drilling system is a commonly used system for deep hole machining, with a wide processing range and high processing quality.
Machine tool processing system: The deep hole drilling test of TA10 is carried out by using BTA deep hole drilling system. The system machine tool is CW6163D deep hole machining machine; The drill bit uses a φ54 mm five-tooth deep hole drill bit, as shown in Figure 1; The blade material is YG8 and the tool angle is shown in Figure 2. The deep hole drilling system is a commonly used system for deep hole machining, with a wide processing range and high processing quality.

Fig.1 Schematic diagram of TA10 titanium alloy deep hole drilling bit

Fig.2 Angle diagram of TA10 titanium alloy deep hole drilling bit
Scanning Electron Microscope JSM - 6390A: A scanning electron microscope is an electron microscope that uses an electron beam to scan a sample surface to obtain sample information.
It can produce high-resolution images of the sample surface, and the images are three-dimensional. Scanning electron microscopy can be used to identify the surface structure of the sample.
It consists of three major parts:
Vacuum systems, electron beam systems, and imaging systems. This article mainly uses it to conduct two experiments. The first is to observe the surface morphology of the blade. Secondly, the wear mechanism of the tool is analyzed by the energy spectrum analysis of the tool surface and the residual components.
Handheld roughness meter:
It is used to measure the surface roughness of a variety of machined parts, calculate the corresponding parameters according to the selected measurement conditions, and clearly display all measurement results and graphics on the LCD. The test piece is a near-α-type titanium alloy TA10, which is a titanium rod of Φ290 mm × 2700 mm.
2, Test scheme
In this experiment, the TA10 bar was drilled and drilled with a 54 mm diameter deep hole drilled through hole. In this experiment, TA10 rod is drilled by using a 54 mm diameter deep hole drill to drill through the hole. Drilling by changing the front and rear corners of the drill. Data were collected by single factor variable method to observe the vibration during processing. The roughness of the inner hole wall of the workpiece is measured by a roughness meter. And the wear condition of the tool is observed by electron microscope to get the best process parameters. The wear mechanism of TA10 material for deep hole drilling was obtained by studying the wear and residual components of the drill bit to analyze the cause of tool wear.
Specific processing parameters:
(1) Processing system: BTA deep hole machining system based on CW6163D deep hole machining machine;
(2) Processing tools: Φ54 five-tooth type wrong tooth deep hole drill bit, blade material YG8 cemented carbide;
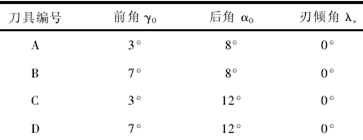
(3) Tool angle: The rake angle is 3°, 7°, the back angle is 8°, 12°, the residual angle is 18°, and the eccentricity of the drill tip is 4 mm.
(4) Workpiece materials: TA10 titanium rod of Φ290 mm × 2700 mm;
(5) Cutting fluid: Emulsion
(6) Movement mode: Tool feed, workpiece rotation;
(7) Cutting parameters: The drilling depth is 2700 mm, the hole diameter is φ55 mm, the tool speed is 145 r/min, and the feed rate is 0.12 mm/r.
Table 2. TA10 titanium rod drilling angle

3, the experimental results
The experimental data obtained from the experiment are shown in Table 3.

Fig. 3 Wear phenomenon of rake face
Considering the relevant processing conditions, it can be known that the plastic deformation ability of the material is poor. When the tool front angle is taken as a small value of 3°, the contact length of the 7° chip and the rake face is increased compared with the front angle, the wear of the rake face is relatively increased, and the tool durability is decreased; However, since the stress concentration of the rake face is slowed down, the cutting temperature and the strength of the tool are reduced. At the same time, it is found that the titanium alloy material has a small modulus of deformation and a small modulus of elasticity during deep hole drilling. In the process of machining, material rebound is serious, which results in friction between tool flank and workpiece at a small angle, resulting in sharp increase of cutting heat and abnormal vibration of the system. The wear phenomenon of the tool is serious, and even the phenomenon of cutting and chipping occurs, so the back angle of the tool needs to be increased, and 12° is preferred. In addition, it is found through comparison that the effect of the tool back angle is more significant than the front angle when cutting the titanium alloy. Therefore, increasing the back angle can improve the tool durability more effectively under the premise of ensuring the tool strength. Therefore, the front angle is 3° and the back angle is 12°. The microscopic results of the wear and tear of the props are shown in Fig. 3 - Fig. 4. It can be seen that in the deep hole drilling of TA10 material, the flank wear of the tool is far more serious than the rake face due to the rebound phenomenon of the material. The dark and light color partitions of the flank face were analyzed by a scanning electron microscope.

Fig. 5 Drilling titanium alloy tool dark zone energy spectrum

Fig. 6 Energy Spectrum of Light Color Zone of Titanium Alloy Drilling Tools
It can be found that a large amount of Ti elements are enriched in the dark areas close to the blade. In the light-colored area far from the edge of the tool, W, Co and other cutting tool materials are dominant. There is only a very small amount of Ti element, which indicates that the workpiece material has obvious adhesion phenomenon under high temperature and high pressure during processing. Comprehensive research found that in the deep hole machining of TA10, due to the high cutting force and cutting temperature, the hardness of the workpiece material is not large, and the affinity is strong. Therefore, the wear of cemented carbide tools is mainly based on bond wear.
In this test, the roughness of the machined hole was measured and analyzed by the TR200 hand-held roughness meter, because the hole depth was large. Therefore, the roughness sampling of the drill hole at the end of the workpiece is used for comparative analysis.

Fig. 7 Surface roughness of the inner hole at different tool angles
As can be seen from Fig.7. On the premise of guaranteeing the strength of the tool, when the front and rear angles of the tool are larger, the tool is sharper and can cut through the hardened layer of the material, thus the surface quality of the hole is higher. For the relatively low hardness of TA10 titanium alloy, the choice of large tool angle during processing is conducive to smooth cutting. And it can be seen that the C-angle deep hole drill has a relatively good processing quality.
4. Conclusion
In this paper, the physical properties and machinability of TA10 titanium alloy were studied and compared with pure titanium TA2 and 45 steel, combined with the characteristics of deep hole processing for deep hole drilling test of TA10 material. For the cutting characteristics of TA10 material, a Φ290 mm × 2700 mm titanium rod was selected for deep hole processing test. Through the test comparison of drill bits from different angles, the following conclusions are drawn:
(1) TA10 has superior plasticity and relatively good high and low temperature strength, and has high specific strength and strong corrosion resistance. Its machinability is similar to that of pure titanium. There are also many disadvantages in processing it, and the application hardening is severe, and the tool wear is fast, which reduces its applicability. During cutting, due to the low elastic modulus of the workpiece material and the small deformation coefficient, the rebound phenomenon of the machined surface is severe, causing severe wear on the flank of the tool; At the same time, the contact time between the chip and the rake face is short, resulting in a large cutting force per unit area of the rake face and a high cutting temperature; In addition, the chemical activity of the titanium element is large, and it is easy to produce a work hardened layer, and at the same time, it adheres to the cutter. This series of machining features accelerates the wear of the tool, especially in deep hole machining, the machining environment is more harsh, and the machining efficiency and effect are not ideal.


