Turning A356 Cast Aluminum Alloy
Material: A356 casting aluminum alloy;
Process: turning, drilling, reaming, tapping
Customer: China Huaneng Group Co., Ltd.
Lead Time: 8 days
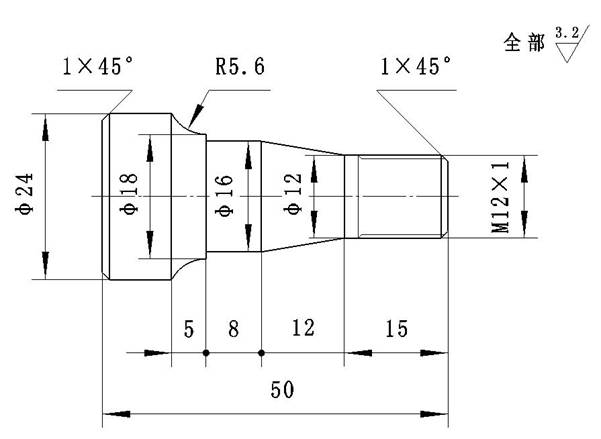
Product parts following figure:

Manufacturing process: Coarse and fine turning with No.1 external turning tool, Cut off the use of No. 4 cutting knife; The tool change point is set at X50, Z100. Please prepare the machining program according to the GSK-980T system requirements.
| Programming settings | ||
| O 1002 ; | Description: | |
| N10 | G50 X50 Z100 ; | Positioning the workpiece coordinate system with tool change points |
| N20 | M3 S560 ; | Spindle start |
| N30 | T0101 ; | Change No. 1 knife |
| N40 | G0 X25 Z2 ; | Rapidly move to the starting point of processing |
| N50 | G71 U0.8 R0.5 ; | Perform a cylindrical roughing cycle |
| N60 | G71 P70 Q140 U0.5 W0.2 F100 ; | Residual capacity X0.5 Z0.2, feed rate 100 mm/min |
| N70 | G0 X4.307 ; | Contouring start line |
| N80 | G1 Z0 F30 ; | Finishing feed rate 30 |
| N90 | G3 X8.268 Z-1.722 R2 ; | |
| N100 | G1 X12 Z-15 ; | |
| N110 | W-5 ; | |
| N120 | X14 ; | |
| N130 | G2 X23.5 Z-30 R15 ; | |
| N140 | Z-45 ; | Contour processing end line |
| N150 | G70 P70 Q140 ; | Finishing cycle execution |
| N160 | G0 X50 Z100 ; | Return tool point |
| N170 | T0404 ; | Change No. 4 cutting knife |
| N180 | G0 X26 Z-36 ; | Locating slot starting point |
| N190 | G1 X18 F10 ; | Grooving |
| N200 | G4 X4 ; | Groove bottom pause for 4 seconds |
| N210 | G0 X26 ; | |
| N220 | Z-40.1 ; | Positioning cutting start point, leaving 0.1mm margin |
| N230 | G1 X12 F15 ; | |
| N240 | G0 X20 ; | |
| N250 | Z-39 ; | Retract to chamfer starting point |
| N260 | G1 X16 Z-40 F10 ; | Turning end chamfer |
| N270 | X0 F10 ; | Cut off, feed rate 10mm/min |
| N280 | G0 X50 Z100 ; | |
| N290 | M5 ; | Replace tool point, stop spindle |
| N300 | T0100 ; | Change back to the benchmark knife |
| N310 | M30 ; | End procedure |
1) To ensure the rigidity of turning when casting aluminum alloy, Generally, the larger diameter part should be turning first, and the smaller diameter part should be turning later.
2) When grooving the shaft workpiece, It should be done before the finisher to prevent the workpiece from being deformed.
3) When fine turning a threaded shaft, In general, the non-threaded part should be finished after threading.
4) before drilling, the end face of the workpiece should be turned flat. Drill the center hole first if necessary.
5) When drilling deep holes, usually the first drill guide bore..
6) When turning (Φ10-Φ20) mm holes, the diameter of the tool shank should be 0.6-0.7 times the diameter of the machined hole; When machining a hole with a diameter larger than Φ20mm, the cutter bar with a clamping head should generally be used.
7) When turning a multi-start thread or multi-start worm, make a trial cut after adjusting the exchange gear.
8) When using the automatic lathe, adjust the relative position of the tool and the workpiece according to the adjustment card of the machine tool. After the adjustment, it is necessary to carry out the trial turning. After the first piece is qualified, it can be processed; During the machining process, the wear of the tool and the workpiece size and surface roughness are always taken care of.
9) in the vertical lathe, turning time, When the knife holder is adjusted, do not move the beam.
10) When the relevant surface of the workpiece has positional tolerances, the turning is done in a single clamping as much as possible.
11) When turning a spur gear tooth blank, the hole and reference end face must be machined in one clamping. If necessary, the marking line should be drawn near the end of the gear indexing circle.


